Adjustment of Basic Functions and Setting Instructions
STEP 3
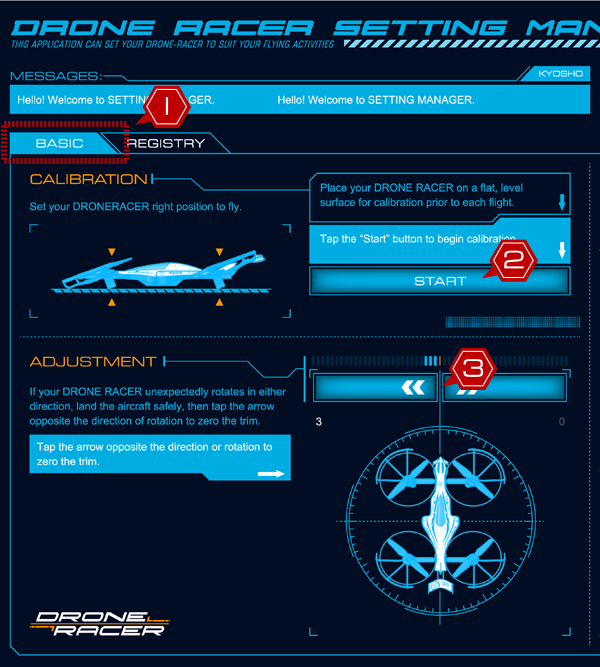
Basic Adjustment
DRONE RACER is a precision flying machine. Crash impact and general wear and tear may cause the model to malfunction. If you think it’s not functioning normally, make adjustments using the “BASIC’ tab.
*This operation must be done in a safe place as the propellers might rotate during adjustment.
*Make sure firmware is updated to the latest version if you are using for the first time.
PART 1
Basic adjustment of model using “BASIC” tab.
At first, only basic model adjustment functions ① can be used on the “BASIC” tab.
After purchase, completing the user registration enables the “SETTING” tab that includes additional adjustments of flight chara cteristics, and allows support information such as firmware updates to be sent to your email address.
If the model drifts in one direction
If there is no disturbance and the model is drifting in one direction (front/rear/right/left), horizontal correction is required.
Place the DRONE RACER on flat ground; select CALIBRATION and ② and the model will memorize its horizontal position.
If model rotates in one direction
Four motors are mounted vertically but if the model rotates in one direction after takeoff, an adjustment is necessary.
Use the arrows in the selection ADJUSTMENT. Click (tap) the arrow that is facing the opposite direction the model is rotating and continue adjusting until it stops rotating.
After changing, please fly again and check.
*Difference between this function and the steering trim
The steering trim adjusts the roll (bank) angle.
However, this AJUSTMENT function adjusts the yaw (heading) angle.
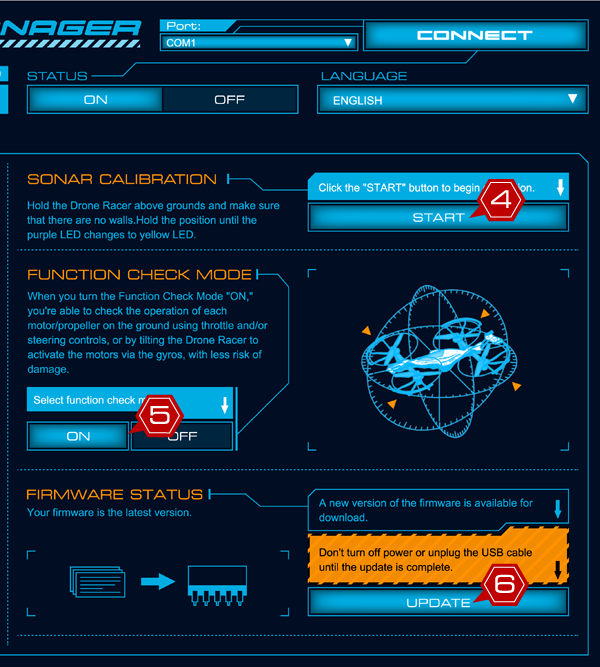
If altitude adjustment of model is unstable
If altitude is not stable during hover, flight, takeoff and landing, adjust the SONAR CALIBRATION.
SONAR is installed on the underside of the model. Hold the model so the SONAR is facing in the direction of an empty space, away from walls etc. Click the start button④ until the LED turns purple, and then starts flashing yellow.
Checking validation before flight
In this mode, the transmitter is needed for adjustment. Turn on the transmitter and set the mode to “ON”, and click “DISCONNECT” button. Disconnect the USB cable and unlock the motor safety function using the transmitter. Then, you can check the functionality of controls. (Note: Pay attention to rotating propellers.)
While this mode is ON, you can check motor and propeller rotating direction, gear backlash and gyro sensor movement without the model taking off.
Check movement of rotating parts as well as throttle and steering control.Also, check that the gyro sensor is working correctly by tilting the model without touching the transmitter.
After checking functionality, turn on the safety lock from the transmitter. Connect the USB cable and click “CONNECT” button and change the mode to “OFF.”
*Always set this mode to “OFF” after adjustment.
Updating the model with the latest control
The “UPDATE” button will become active when a new version of software is available to improve the function of the model.
While updating, DO NOT power off or remove the USB cable until the update completes.
Details of update are explained in “STEP 5”.
STEP 4
Setting
Settings can be adjusted to change the flying characteristics of the model. Parameters can be changed to suit different flying area conditions and pilot preferences for easier flying control.
*The Drone Racer might not be able to fly in a certain combination of parameter values depending on flight environment, settings and other conditions.
PART 1
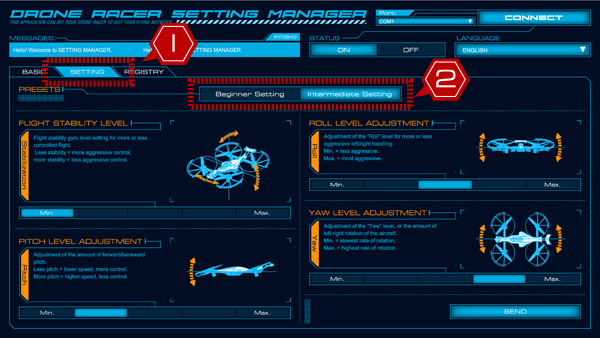
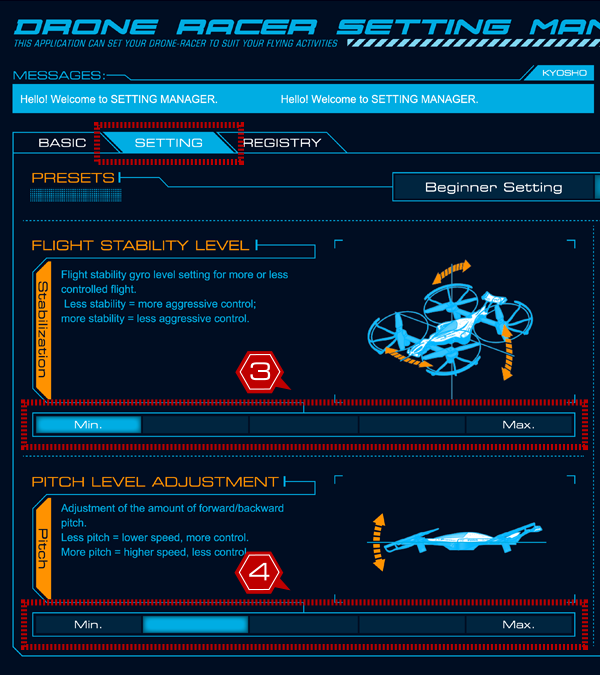
“SETTING” tab - ① displays the adjustable setting itemsClick ① “SETTING” tab to commence adjustment.
Next, select ②“PRESETS” and choose “Beginner Setting” and “Intermediate Setting” to change from the basic settings, and then change the setting parameters to suit your preference.
PART 2
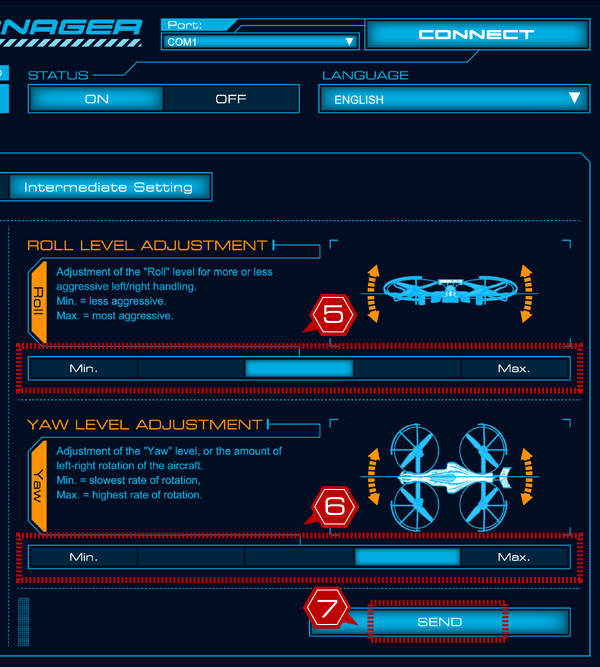
"Intermediate Setting" use for Defines precision movement of the modelStablizing during a disturbance
When the model is subject to a disturbance such as wind, set the resistance strength higher to maintain stability.
Focus on straight-line speed
Increasing pitch angle increases the straight-line speed but reduces stability of model. Adjust to suit to the flying course layout.
Making quick turns through corners
Increasing roll level allows the model to bank when turning and enables faster speed through the turns. If banking is too steep, altitude can drop so more precise control is required.
Improving steering efficiency
Adjust turning response speed when steering. Improving turning ability requires more precise control.
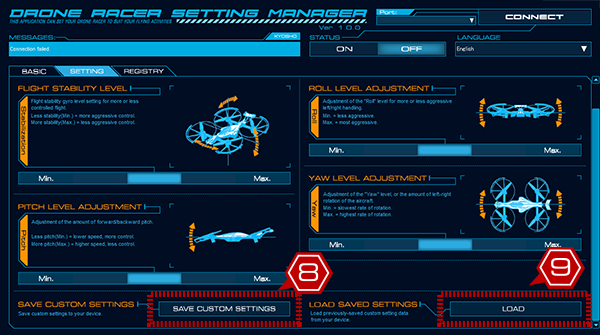
Send setting changes to the model
When making setting changes, press “Send” button.
Saving setting selections
Name the setting and save.
*Settings cannot be named with Android terminals.
Opening previously saved settings
Use the “LOAD” button to load previously saved settings.